REACT
Component-
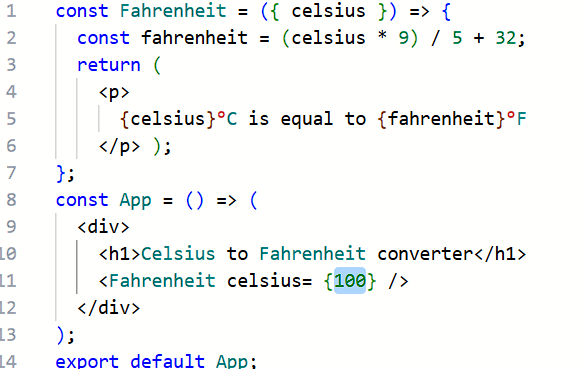
React element is the smallest building block of React application. It is just a plain object that tells React what we want to see on the screen. React components are built using React elements.
createElement calls. Such conversions of source code from one format to another are termed as Transpiling.In React, component names must start with a capital letter (PascalCase) to distinguish them from regular HTML tags.
JSX like <HelloWorld /> gets transpiled to: React.createElement(HelloWorld, null);
Whereas <button>Click here</button> becomes: React.createElement("button", null, "Click here");
If you name a component in lowercase (e.g., helloWorld), JSX treats it as an HTML tag, not a React component:
✅ Always use PascalCase for custom components.
props 
 we can also write as "100"


Box is a custom React component that takes children as a prop.children represents everything placed inside <Box>...</Box>( it’s just a wrapper component.You could use a <div>, <section>, or even nothing (<>...</>) instead.).React automatically passes those two elements as an array to children.Box?-To re-use styles or logic in one place.{children} and not [children]?{children}tells React to render the actual children.[children]is just an array containing the wholechildrenobject — won’t render correctly unless handled properly.
Passing props from an object:
-
Spreading variables as props:
-
Different variable and prop names: If the variable and prop names are different, you still need to pass them individually:
-
Handling multiple object properties:


.map() method to loop through the array and create components dynamically.Step 1: Create a data array
</div> );};
KEY-
In React, when we use the map method to generate an array of JSX, we need to provide a key prop to the top level element within the map method. This key is like a label that tells React which specific item from the array each component represents. so Book gets modified to - const Books = () => ( BOOKS.map(book => <Book {...book} key={book.id} />));but if we try to access key in const Book = ({ title, author }) => ( <div> <p>Book title: {title}</p> <p>Author: {author}</p> </div>);
so we do  why not use index as key as its used as key as default- ✅ Using
 fruit.id as key
 
Limitations of JS (more on JS) -HTML Attribute JSX Equivalent Notes classclassNameclass is a reserved keyword in JavaScript.forhtmlForUsed in <label> elements. style="..."style={{ ... }}JSX uses a JS object with camelCase style keys. onclickonClickAll event handlers are camelCase. tabindextabIndexAttribute names are camelCase in JSX. maxlengthmaxLengthCamelCase attribute. readonlyreadOnlyBoolean attributes use camelCase. colspan, rowspancolSpan, rowSpanTable-related attributes use camelCase too. contenteditablecontentEditableFollows camelCase. Self-closing tags Must be self-closed e.g., <img />, <input />, <br /> in JSX.
cd "/mnt/e/BigBinary Things/smile-cart-frontend"
.......STATE -
To store dynamic values associated with a component, we can use the concept of state from React. React state stores a value, keeps track of its changes, and updates the user interface .This is made accessible through special functions known as hooks. useState-hook , enables us to create states. It accepts an initial value and returns an array containing the current value of the state variable and a function to update this state variable. - state initial value = initialValue
- setState is a function to update state variable.

There are a couple of rules that we need to follow while using hooks:
- Hooks should only be called within React components. It is not valid to call hooks outside components.
- Hooks should be called at the top level of the React component, before any early returns. This means that hooks cannot be called inside loops, conditions, or nested functions.
EVENT LISTENER- You might be familiar with handling events in JavaScript. In JavaScript, browser events are handled by attaching event listeners to DOM elements:
1const button = document.getElementById("buttonId");
2
3const handleClick = () => {
4 // code to be executed on button click
5};
6
7button.addEventListener("click", handleClick);this is another way- <button onclick="handleClick()">Click</button>React follows a pattern similar to HTML for event handling, but there are two key distinctions:
- React event handler props are named using camelCase instead of lowercase like,
onClick, onChange, onKeyDown, etc. - With JSX, we pass the function reference as the event handler instead of a string.
Here is an example of handling an event in React:
1const Component = () => {
2 const handleClick = () => {
3 // code to be executed on button click
4 };
5
6 return <button onClick={handleClick}>Click</button>;
7};For onClick, onChange, setter functions, and similar event handlers, it is a common convention to name the functions with a handle prefix, such as handleClick, handleChange, we are doing something like - so now the code with eventhandler , states- const Carousel = ({ imageUrls, title }) => {
2 const [currentIndex, setCurrentIndex] = useState(0);
3
4 const handleNext = () => {
5 const nextIndex = (currentIndex + 1) % imageUrls.length;
6 setCurrentIndex(nextIndex);
7 };
8
9 const handlePrevious = () => {
10 const previousIndex =
11 (currentIndex - 1 + imageUrls.length) % imageUrls.length;
12 setCurrentIndex(previousIndex);
13 };
14
15 return (
16 <div className="flex items-center">
17 <Button
18 className="shrink-0 focus-within:ring-0 hover:bg-transparent"
19 icon={Left}
20 style="text"
21 onClick={handlePrevious}
22 />
23 <img
24 alt={title}
25 className="max-w-56 h-56 max-h-56 w-56"
26 src={imageUrls[currentIndex]}
27 />
28 <Button
29 className="shrink-0 focus-within:ring-0 hover:bg-transparent"
30 icon={Right}
31 style="text"
32 onClick={handleNext}
33 />
34 </div>
35 );
36};
37
38export default Carousel;why do we even need a state? Can't we use a local variable-the UI remains the same. This happens because the changes to the local variables don't trigger a re-render to update the component with the new data.
so now the code with eventhandler , states- const Carousel = ({ imageUrls, title }) => {
2 const [currentIndex, setCurrentIndex] = useState(0);
3
4 const handleNext = () => {
5 const nextIndex = (currentIndex + 1) % imageUrls.length;
6 setCurrentIndex(nextIndex);
7 };
8
9 const handlePrevious = () => {
10 const previousIndex =
11 (currentIndex - 1 + imageUrls.length) % imageUrls.length;
12 setCurrentIndex(previousIndex);
13 };
14
15 return (
16 <div className="flex items-center">
17 <Button
18 className="shrink-0 focus-within:ring-0 hover:bg-transparent"
19 icon={Left}
20 style="text"
21 onClick={handlePrevious}
22 />
23 <img
24 alt={title}
25 className="max-w-56 h-56 max-h-56 w-56"
26 src={imageUrls[currentIndex]}
27 />
28 <Button
29 className="shrink-0 focus-within:ring-0 hover:bg-transparent"
30 icon={Right}
31 style="text"
32 onClick={handleNext}
33 />
34 </div>
35 );
36};
37
38export default Carousel;why do we even need a state? Can't we use a local variable-the UI remains the same. This happens because the changes to the local variables don't trigger a re-render to update the component with the new data.Even if our component was somehow re-rendered, changes to the local variables won't persist between re-renders. This is because every time React wants to re-render the Carousel component, it invokes the Carousel function again. As you might already know, calling a function will initialize all the local variables defined within it afresh. Therefore, every time React re-render the Carousel component, the local variable currentIndex will get reset to 0.React state overcomes the above limitations of the local variables using:
- A state variable to retain the data between renders, and
- A state setter function to update the variable and trigger React to render the component again.
When a component is invoked for the first time, the useState hook creates a state and assigns the initial value passed to it. Eventually, when we invoke the state setter function setCurrentIndex, we are telling React to update the state variable currentIndex and trigger a re-render.
flowchart-  Async - we learned that setting a state variable triggers re-rendering. However, there is a nuance to this process. React doesn't update the state variable and re-render the component immediately after calling the state setter function. Instead, it waits until all the code in the event handlers has run before processing your state updates.
Synchronous updates are "half-finished,".Consider a component with the following event handler that updates three state variables:1const handleUpdate = () => {
2 setFirstName("John");
3 setLastName("Doe");
4 setAge(30);
5}When handleUpdate is called, the setFirstName function updates the firstName state, triggering a re-render of the component. This cycle repeats for setLastName and setAge, resulting in three consecutive re-renders. In the synchronous state update scenario, React has performed three times the work compared to the asynchronous case . For instance, after the setFirstName call, only the firstName is updated, leaving the remaining state variables with stale values.
To prevent such "half-finished" and unnecessary re-renders, React batches state updates. Because state updates are asynchronous, setting state doesn't immediately reflect changes within the same render cycle. Instead, updates are scheduled for the next render. This means that multiple state updates within an event handler don’t accumulate changes as expected. In the event handler below, despite calling setCurrentIndex three times, only the last state update takes effect, resulting in the currentIndex being incremented only once.
1const handleNavigateToLastImage = () => {
2 setCurrentIndex(currentIndex + 1);
3 setCurrentIndex(currentIndex + 1);
4 setCurrentIndex(currentIndex + 1);
5}but what if we need to update the same state variable multiple times? To address this, React provides an option to supply a callback function to the state setter function.
const handleNext = () => {
2 setCurrentIndex(prevIndex => prevIndex + 1);
3 setCurrentIndex(prevIndex => prevIndex + 1);
4 setCurrentIndex(prevIndex => prevIndex + 1);
5}Here, instead of passing the new value of the currentIndex variable, we pass a function that calculates the next state value. This function is referred to as the updater function.
React Component Lifecycle & Side Effects – Simplified:
React components go through three main phases in their life:
1. Mounting – When the component appears on the screen for the first time.
2. Updating – When the component changes due to new props or state.
3. Unmounting – When the component is removed from the screen.
Example: Counter App
Mounting: Clicking "Mount Counter" adds the Counter to the screen.
Updating: Clicking "Increase Count" updates the number.
Unmounting: Clicking "Unmount Counter" removes the Counter.
Rerendering vs Remounting:
Rerendering: The component stays in the DOM but updates its content (like changing count or color). It remembers its state.
Remounting: The component is removed and added again. It loses its previous state (like resetting count or color).
Simple Example: Light Bulb
"Change Color" → Rerender (bulb stays, just changes color)
"Hide Light" + "Show Light" → Remount (bulb disappears and reappears, color resets)
useEffect Hook -
Purpose: Manages side effects in React components (e.g., API calls, timers, subscriptions).
Arguments:
Effect Function – Logic that interacts with the outside world.
Dependency Array (optional) – Controls when the effect re-runs.
Scenarios:
No Dependencies ([]): Runs only on the initial render.
With Dependencies: Runs whenever any dependency value changes
No Array Provided: Runs after every render.
Example:
Logs message only when count updates.
In React 18, Strict Mode triggers a double render during development (not in production). Why? Detect Side Effects: Catches unexpected changes outside the component. Test Cleanup Logic: Ensures effects like timers or subscriptions are properly cleared.
It is important to cleanup after using effects-  here the carousal images change after every 3 seconds. if we dont use clearInterval then leads to memory leaks and unexpected behavior, unnecessary resource consumption even after component is removed from DOM.
What is useRef?useRef is a React hook that allows you to create a persistent reference to a value or a DOM element. Unlike state, changes to a ref do not cause re-renders.syntax- const ref = useRef(initialValue); initialValue: The initial value for the ref. It can be anything (null, number, object, etc.).ref.current: This is where the value is stored.When to use it?
To store values that do not trigger re-renders (like timers, previous state values, etc.To reference DOM elements directly (like focusing an input field).
What is Axios?
Axios is a JavaScript library used to make HTTP requests from the browser.It is Promise-based, just like the fetch API, but with additional features:
Automatic JSON parsing.
Easier request interception.
Better error handling.
Supports request cancellation.
Performing a GET request
1const response = await axios.get("https://example.com/sample");ex-
Performing a POST request
1const payload = {
2 title: "My New Post",
3 body: "This is the content of the post.",
4};
5
6const response = await axios.post("https://example.com/posts",payload);Performing a PUT request
1const payload = {
2 title: "My updated Post",
3 body: "This is the updated content of the post.",
4};
5
6const response =await axios.put("https://example.com/posts/1",payload);Performing a DELETE request
1const response = await axios.delete("https://example.com/posts/1");using query to filter GET output , Passing Query Parameters-in method 1 - Query parameters are added to the end of a URL and are separated from the base URL by a question mark ? followed by key-value pairs, each pair is separated by an ampersand & symbol.
Axios API Integration in React:
Main Goal:
To fetch product details from an API and display them on a React component.
We want the user to:
See a loading spinner while data is being fetched.
See the product details when the data is ready.
See an error message if something goes wrong.
1️⃣ Setting Up Axios:
Axios is a library that lets you make HTTP requests (like fetching data from APIs) easily.
import axios from "axios";
2️⃣ Writing the Fetch Function (fetchProduct):
We create an asynchronous function to fetch data from the API.
const fetchProduct = async () => {
try {
const response = await axios.get(
"https://smile-cart-backend-staging.neetodeployapp.com/products/infinix-inbook-2"
);
console.log("API response", response);
} catch (error) {
console.log("An error occurred:", error);
}
};async: Allows the use of await.
await: Waits for the data to come back from the API.
try...catch: Catches errors if something goes wrong (like no internet).
3️⃣ Storing Data in State:
We use React state to save the data when it arrives.
import { useState } from "react";
const [product, setProduct] = useState({});product: This is where we store the product details.
setProduct: This updates the state when data is fetched.
Inside fetchProduct, we do:
setProduct(response.data);
4️⃣ Calling fetchProduct When the Component Loads:
We use useEffect to run fetchProduct when the page first loads.
import { useEffect } from "react";
useEffect(() => {
fetchProduct();
}, []);[] means it runs only once when the page loads.
5️⃣ Showing a Loader While Fetching:
We don't want the screen to be empty while data is loading.
const [isLoading, setIsLoading] = useState(true);
In the fetchProduct function:
finally {
setIsLoading(false);
}6️⃣ Displaying the Data:
Finally, we show the product details or a loader.
if (isLoading) {
return <div>Loading...</div>;
}
return (
<div>
<h2>{product.name}</h2>
<p>{product.description}</p>
<p>Price: ₹{product.offer_price}</p>
</div>
);
Final Full Code:
import axios from "axios";
import { useState, useEffect } from "react";
const ProductDetails = () => {
const [product, setProduct] = useState({});
const [isLoading, setIsLoading] = useState(true);
const fetchProduct = async () => {
try {
const response = await axios.get(
"https://smile-cart-backend-staging.neetodeployapp.com/products/infinix-inbook-2"
);
setProduct(response.data);
} catch (error) {
console.log("An error occurred:", error);
} finally {
setIsLoading(false);
}
};
useEffect(() => {
fetchProduct();
}, []);
if (isLoading) {
return <div>Loading...</div>;
}
return (
<div>
<h2>{product.name}</h2>
<p>{product.description}</p>
<p>Price: ₹{product.offer_price}</p>
</div>
);
};
export default ProductDetails;
💡 Key Points:
Axios → For fetching data from APIs
Async/Await → To wait for data to load.
try...catch → To handle errors properly.
useState → To store the product data.
useEffect → To fetch data when the component mounts.
Loader → To show a spinner while data is loading.
(Client-Side Routing):
When you visit example.com/home, the browser loads the application once (HTML, CSS, JS).
When you click a link (e.g., to example.com/about):
-Only the URL changes in the address bar.
-The browser does not reload the page.
-JavaScript (like React Router) handles showing the new content instantly.
How?
-React Router handles navigation inside the browser.
-Instead of reloading everything, it switches components—like swapping the "Home" component for the "About" component.
-This is super fast because there is no new server request for the page.1️⃣ BrowserRouter:
Acts as a wrapper around your app to enable routing.
Utilizes the HTML5 History API to keep the UI in sync with the URL.
import { BrowserRouter } from "react-router-dom";
import App from "./App";
root.render(
<BrowserRouter>
<App />
</BrowserRouter>
);2️⃣ Route:
Maps a URL path to a specific component.
By default, it matches any URL that starts with the specified path.
Use exact to match the path precisely.
import { Route } from "react-router-dom";
<Route exact path="/" component={Home} />
<Route exact path="/product" component={Product} />3️⃣ Link:
Provides navigation between routes without refreshing the page.
Uses <a> tags under the hood but prevents a full-page reload.
import { Link } from "react-router-dom";
<Link to="/">Home</Link>
<Link to="/product">Product</Link>4️⃣ Switch:
Renders only the first matching route.
Improves efficiency by stopping after the first match.
Order matters: More specific routes should go before more generic ones.
import { Switch, Route } from "react-router-dom";
<Switch>
<Route exact path="/product" component={Product} />
<Route exact path="/" component={Home} />
</Switch>5️⃣ Wildcard Route (*)
Catches all unmatched paths.
Used for displaying a 404 Page Not Found.
<Switch>
<Route exact path="/" component={Home} />
<Route exact path="/product" component={Product} />
<Route path="*" component={PageNotFound} />
</Switch>6️⃣ NavLink (Enhanced Link):
Same as Link, but allows for active styling when the URL matches.
Accepts activeClassName to add custom styles.
import { NavLink } from "react-router-dom";
<NavLink exact to="/" activeClassName="underline font-bold">
Home
</NavLink>
<NavLink exact to="/product" activeClassName="underline font-bold">
Product
</NavLink>7️⃣ Important Concepts to Remember:
Client-side routing → Prevents full-page reloads, leading to faster navigation.
exact vs. non-exact:
Without exact: / matches /product because it’s a prefix.
With exact: It only matches if the path is exactly /.
Order of Routes in Switch: More specific routes should be defined first.
""


Comments
Post a Comment